


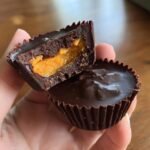
Imagine sinking your teeth into a rich, velvety chocolate cup that melts in your mouth, revealing a luscious and creamy pumpkin filling that’s perfectly spiced. These Chocolate Pumpkin Butter Cups are not just a treat; they’re a delightful fusion of flavors that captures the essence of fall in every bite. The combination of dark chocolate and pumpkin is surprisingly harmonious, creating a dessert that feels indulgent yet comforting.
Growing up, my autumns were filled with the sweet aroma of pumpkin spice wafting through the kitchen, and these butter cups bring back those nostalgic memories. As the leaves change color and the air turns crisp, there’s nothing quite like enjoying a few of these treats with loved ones. Whether you’re hosting a gathering or simply treating yourself, Chocolate Pumpkin Butter Cups are the perfect way to celebrate the season. Easy to make and even easier to love, they are sure to become a favorite in your dessert repertoire.

Ingredients for Chocolate Pumpkin Butter Cups
- 1 cup dark chocolate chips – Ensure to use high-quality dark chocolate chips for a rich flavor. Melt them in a microwave-safe bowl until smooth.
- 1/2 cup pumpkin puree – Use canned pumpkin puree or homemade for a fresh taste. This will be the base of your creamy filling.
- 1/4 cup almond butter – This adds creaminess and a nutty flavor. You can substitute with peanut butter or sunflower seed butter if desired.
- 2 tablespoons maple syrup – This natural sweetener complements the pumpkin and provides a touch of sweetness.
- 1 teaspoon cinnamon – A warm spice that enhances the pumpkin flavor and brings out the fall essence.
- 1/4 teaspoon nutmeg – Adds a subtle depth of flavor; a little goes a long way in this recipe.
- 1/4 teaspoon salt – Balances the sweetness and enhances the overall flavor of the filling.
How to Prepare Chocolate Pumpkin Butter Cups
Step 1: Melt the Chocolate
Start by measuring out 1 cup of dark chocolate chips and placing them in a microwave-safe bowl. Heat the chocolate in the microwave for 30 seconds at a time, stirring in between each interval to ensure even melting. This process usually takes about 1 to 2 minutes total, depending on your microwave’s power. Be careful not to overheat the chocolate, as it can burn easily. Once melted, the chocolate should be smooth and glossy, ready for the next step.
Step 2: Prepare the Muffin Tin
While the chocolate is melting, take a standard muffin tin and line it with cupcake liners. Using liners is crucial as it prevents the chocolate cups from sticking to the tin, allowing for easy removal once they are set. Choose colorful or festive liners to add a fun touch to your presentation. Make sure each liner is securely placed in the muffin tin to hold the melted chocolate and filling.
Step 3: Create the Chocolate Base
Once your chocolate is melted, carefully pour a small amount of the melted chocolate into each cupcake liner, filling them about one-third of the way. Using a spoon or a pastry brush, spread the chocolate evenly across the bottom and up the sides of each liner to form a solid base. This step is essential to ensure that the pumpkin filling will be securely encased in chocolate. After creating the bases, place the muffin tin in the refrigerator for about 10 minutes to allow the chocolate to set slightly.
Step 4: Make the Pumpkin Filling
While the chocolate base is setting, prepare the pumpkin filling. In a separate mixing bowl, combine 1/2 cup of pumpkin puree, 1/4 cup of almond butter, 2 tablespoons of maple syrup, 1 teaspoon of cinnamon, 1/4 teaspoon of nutmeg, and 1/4 teaspoon of salt. Use a whisk or spatula to mix the ingredients until they are well combined and smooth. The filling should be thick yet creamy, with a nice balance of sweetness and spice that complements the chocolate.
Step 5: Assemble the Cups
Once the chocolate base has firmed up, remove the muffin tin from the refrigerator. Carefully spoon the pumpkin filling into each chocolate-lined cup, filling them to about three-quarters full. Gently tap the muffin tin on the counter to level the filling and eliminate any air bubbles. Next, pour the remaining melted chocolate over the top of the pumpkin filling, ensuring that each cup is completely covered. This final layer of chocolate will seal in the filling and create a beautiful, glossy finish.
Step 6: Chill and Serve
After assembling the Chocolate Pumpkin Butter Cups, place the muffin tin back in the refrigerator for at least 30 minutes or until the chocolate is completely set. Once they are firm to the touch, carefully remove the cups from the liners. You can use a small knife to gently loosen the edges if needed. Serve the Chocolate Pumpkin Butter Cups chilled or at room temperature, and enjoy this delightful fall-inspired treat with friends and family!
Nutritional Information
When enjoying Chocolate Pumpkin Butter Cups, it’s essential to be mindful of the nutritional content. The values provided below are estimates and can vary based on specific brands and ingredients used in your preparation. Always refer to packaging for the most accurate information.
- Serving Size: 1 cup
- Calories: 150
- Sugar: 8g
- Sodium: 50mg
- Fat: 9g
- Saturated Fat: 3g
- Unsaturated Fat: 6g
- Trans Fat: 0g
- Carbohydrates: 15g
- Fiber: 2g
- Protein: 3g
- Cholesterol: 0mg
These Chocolate Pumpkin Butter Cups are not only a delicious treat but also provide a unique balance of flavors and nutrients, making them a wonderful addition to your dessert options.
Why You’ll Love This Recipe
- Quick and Easy Preparation: With a total time of just 45 minutes, these Chocolate Pumpkin Butter Cups are simple to make, perfect for both novice and experienced bakers.
- Unique Flavor Combination: The rich, dark chocolate paired with the creamy, spiced pumpkin filling creates a delightful taste experience that is both indulgent and comforting.
- Seasonal Delight: These treats capture the essence of fall, making them a perfect dessert for autumn gatherings, Halloween parties, or Thanksgiving celebrations.
- Customizable Ingredients: You can easily modify the recipe to cater to dietary needs, such as using dairy-free chocolate for a vegan option or swapping nut butters for allergies.
- Healthier Indulgence: Made with wholesome ingredients like pumpkin puree and almond butter, these cups offer a sweet treat that is also rich in nutrients and fiber.
- Make Ahead & Store: These cups can be prepared in advance and stored in the refrigerator, making them an ideal dessert for busy schedules.
Tips for Success
To ensure your Chocolate Pumpkin Butter Cups turn out perfectly every time, keep these practical tips in mind:
Ensure Chocolate is Fully Melted
It’s crucial to melt the chocolate chips completely until they are smooth and glossy. If the chocolate is not melted enough, it can become clumpy and won’t spread easily in the muffin liners. Use short bursts in the microwave, stirring in between, to achieve the right consistency without overheating.
Adjust Spices to Taste
The spices in the pumpkin filling can be adjusted based on your personal preference. If you love cinnamon, feel free to add a little extra! Likewise, if you prefer a milder flavor, reduce the amount of nutmeg or cinnamon. Tasting the filling before assembling the cups allows you to customize the flavor to your liking.
Use Quality Ingredients
Using high-quality dark chocolate and fresh pumpkin puree makes a noticeable difference in flavor. Opt for chocolate that contains at least 70% cocoa for a rich taste, and consider using organic pumpkin puree if available. Quality ingredients will enhance the overall outcome of your dessert.
Cool Chocolate Gradually
After melting the chocolate, let it cool slightly before pouring it into the muffin liners. If the chocolate is too hot, it may melt the liners or affect the texture of the pumpkin filling when assembled. Allow it to cool for a few minutes until it’s warm but not hot to the touch.
Don’t Rush the Refrigeration
Allow the Chocolate Pumpkin Butter Cups to chill for the full 30 minutes, or even longer if needed, until they are completely set. This step is essential for achieving the right texture and ensuring the cups hold their shape when removed from the liners.
Experiment with Toppings
Feel free to get creative by adding toppings to your chocolate cups before they set. Chopped nuts, a sprinkle of sea salt, or a drizzle of caramel can elevate the flavor and add a unique touch to your Chocolate Pumpkin Butter Cups.
Variations on Chocolate Pumpkin Butter Cups
While the classic Chocolate Pumpkin Butter Cups are absolutely delightful on their own, there are several fun variations you can try to customize them to your taste or dietary preferences. Here are some suggestions:
Flavor Variations
- Nut Butter Swaps: Instead of almond butter, experiment with different nut butters like peanut butter, cashew butter, or even sunflower seed butter for a nut-free option. Each will impart a unique flavor to the filling.
- Spice It Up: Add a pinch of ginger or allspice to the pumpkin filling for an extra kick. If you enjoy a more intense flavor, consider doubling the cinnamon or nutmeg.
- Chocolate Variations: Use milk chocolate or white chocolate instead of dark chocolate for a sweeter, creamier taste. You can also mix in flavored chocolate, such as sea salt caramel chocolate, for an added twist.
- Fruit Additions: Incorporate some finely chopped dried fruits like cranberries or raisins into the pumpkin filling for added texture and sweetness.
Dietary-Friendly Adjustments
- Vegan Option: To make these Chocolate Pumpkin Butter Cups vegan, ensure you use dairy-free chocolate and replace almond butter with a plant-based alternative that suits your dietary needs.
- Gluten-Free: This recipe is naturally gluten-free, but be sure to check the labels on all ingredients to ensure they meet gluten-free standards, especially the chocolate.
- Low-Sugar Variation: If you’re looking to reduce sugar, consider using a sugar substitute like stevia or monk fruit sweetener in place of maple syrup, adjusting to taste.
- Protein Boost: For an added nutritional punch, mix in a scoop of your favorite protein powder into the pumpkin filling. This works especially well with vanilla or chocolate-flavored protein.
These variations allow you to get creative with your Chocolate Pumpkin Butter Cups, ensuring that there’s a version for everyone to enjoy, no matter their dietary preferences or flavor inclinations!
Storage & Reheating Instructions
To keep your Chocolate Pumpkin Butter Cups fresh and delicious, proper storage is essential. Follow these guidelines to ensure they maintain their flavor and texture:
Best Storage Methods
Once your Chocolate Pumpkin Butter Cups are fully set, transfer them to an airtight container. Layer them with parchment paper between each cup to prevent sticking. Store the container in the refrigerator, where they will stay fresh for up to one week. If you prefer to keep them longer, consider freezing the cups. Place them in a freezer-safe container or bag, separating layers with parchment paper, and they can last for up to three months.
Reheating Tips
If you choose to freeze your Chocolate Pumpkin Butter Cups, it’s important to defrost them properly to maintain their texture. To do this, transfer them from the freezer to the refrigerator and allow them to thaw overnight. For a quick option, you can leave them at room temperature for about 30 minutes before serving. Avoid reheating them in the microwave or oven, as this can cause the chocolate to melt and lose its shape. Enjoy them chilled straight from the fridge or at room temperature for the best experience!
What to Serve with Chocolate Pumpkin Butter Cups
Pairing your Chocolate Pumpkin Butter Cups with complementary flavors and textures can elevate your dessert experience. Here are some delightful suggestions to consider:
Coffee or Hot Chocolate
The rich, creamy nature of Chocolate Pumpkin Butter Cups pairs beautifully with a warm beverage. Consider serving them alongside a cup of freshly brewed coffee or a luxurious hot chocolate. The bitterness of the coffee enhances the sweetness of the chocolate, while hot chocolate can create a comforting, indulgent experience.
Spiced Whipped Cream
A dollop of spiced whipped cream can add a light and airy contrast to the dense chocolate cups. You can make your own by whipping heavy cream with a touch of cinnamon and vanilla extract, or use store-bought spiced whipped cream for convenience. This addition will enhance the autumnal flavors of the pumpkin filling.
Fruit Salad
A refreshing fruit salad can provide a bright, tart contrast to the rich flavors of the Chocolate Pumpkin Butter Cups. Consider a mix of seasonal fruits like apples, pears, and pomegranate seeds, dressed lightly with a citrus vinaigrette. The freshness will cleanse the palate and balance the sweetness of the cups.
Cheese Platter
For a unique twist, serve your chocolate cups with a selection of cheeses. Creamy cheeses like brie or mascarpone can complement the richness of the chocolate, while sharper cheeses like aged cheddar can provide a delightful contrast. Add some nuts and dried fruits to the platter for extra texture and flavor.
Ice Cream or Sorbet
For those who enjoy frozen desserts, consider pairing Chocolate Pumpkin Butter Cups with a scoop of vanilla ice cream or pumpkin spice sorbet. The creamy texture of the ice cream balances the chocolate and pumpkin flavors, creating a decadent treat that is perfect for fall.
Chocolate Dipped Pretzels
For a crunchy and salty element, serve chocolate-dipped pretzels alongside your Chocolate Pumpkin Butter Cups. The salty-sweet combination is always a hit and adds an interesting texture contrast to the smoothness of the pumpkin filling.
These pairing options will not only enhance the flavors of your Chocolate Pumpkin Butter Cups but also create a delightful dessert spread that your guests will love. Whether it’s a cozy gathering or a festive celebration, these suggestions will elevate your dessert experience to new heights!
Print
Chocolate Pumpkin Butter Cups
- Total Time: 45 minutes
- Yield: 12 cups 1x
- Diet: Vegetarian
Description
Delicious chocolate cups filled with creamy pumpkin butter.
Ingredients
- 1 cup dark chocolate chips
- 1/2 cup pumpkin puree
- 1/4 cup almond butter
- 2 tablespoons maple syrup
- 1 teaspoon cinnamon
- 1/4 teaspoon nutmeg
- 1/4 teaspoon salt
Instructions
- Melt the dark chocolate chips in a microwave-safe bowl.
- Line a muffin tin with cupcake liners.
- Pour a small amount of melted chocolate into each liner and spread it to cover the bottom.
- In a separate bowl, mix pumpkin puree, almond butter, maple syrup, cinnamon, nutmeg, and salt.
- Fill each chocolate-lined cup with the pumpkin mixture.
- Top with remaining melted chocolate to cover the pumpkin filling.
- Refrigerate for at least 30 minutes until set.
- Remove from liners and serve.
Notes
- Store in an airtight container in the refrigerator.
- Use dairy-free chocolate for a vegan option.
- Adjust spices according to your taste.
- Prep Time: 15 minutes
- Cook Time: 10 minutes
- Category: Dessert
- Method: No-bake
- Cuisine: American
Nutrition
- Serving Size: 1 cup
- Calories: 150
- Sugar: 8g
- Sodium: 50mg
- Fat: 9g
- Saturated Fat: 3g
- Unsaturated Fat: 6g
- Trans Fat: 0g
- Carbohydrates: 15g
- Fiber: 2g
- Protein: 3g
- Cholesterol: 0mg
Keywords: Chocolate Pumpkin Butter Cups
Find it online: https://cravirecipes.com/chocolate-pumpkin-butter-cups/